JM Digital Lab
Free Workshop · ระดับประถม 4–6
Free Workshop · Grades 4–6
ควบคุมRobot
ด้วย micro:bit
Control Robot
with micro:bit
เขียนโค้ด MakeCode ให้ micro:bit รับคำสั่ง BLE UART แล้วสั่ง robot เคลื่อนที่ตามที่ออกแบบ Write MakeCode to receive BLE UART commands from the Gamepad app and drive a robot you designed
🎯 เป้าหมายของ Workshop
🎯 Workshop Objective
เด็กๆ จะได้ เขียนโค้ด MakeCode บน micro:bit ให้รับคำสั่ง BLE UART จากแอป Gamepad for micro:bit — แล้วโปรแกรม robot ให้เคลื่อนที่ตามคำสั่ง ที่ออกแบบเอง ตั้งแต่คิด logic จนถึงกดปุ่มแล้ว robot ขยับจริง! Students will write MakeCode on micro:bit to receive BLE UART commands from the Gamepad for micro:bit app — then program the robot to move as designed, from thinking through the logic to pressing a button and watching the robot move!
📡 การเชื่อมต่อ Bluetooth — สิ่งสำคัญที่ต้องรู้ก่อน
📡 Bluetooth Connection — Key Notes Before You Start
BLE UART · micro:bit
ไม่ต้องจับคู่ผ่านระบบ
No System Pairing Required
ไม่ต้อง Pair ในระบบ
No Pairing Needed
ไม่ต้องเปิด Bluetooth Settings ของโทรศัพท์แล้วกด Pair เปิดแอป Gamepad แล้วกด Scan ได้เลยทันที
Do not use phone Bluetooth Settings to pair — open the Gamepad app and tap Scan directly. No system pairing step needed.
วิธีเชื่อมต่อ
How to Connect
เปิดแอป → กด Scan → เลือก BBC micro:bit → กด Connect — เสร็จสิ้น!
Open app → tap Scan → select BBC micro:bit → tap Connect — done!
ถ้าเชื่อมไม่ติด
If It Won't Connect
รีสตาร์ท micro:bit → กด Scan ใหม่ หรือปิดเปิด Bluetooth โทรศัพท์แล้วลองอีกครั้ง
Restart micro:bit → tap Scan again. Or toggle phone Bluetooth off/on and retry.
1 micro:bit ต่อ 1 โทรศัพท์เท่านั้น
1 micro:bit per phone only
BLE connect ได้ทีละ 1 อุปกรณ์ ถ้ามีโทรศัพท์หลายเครื่อง ต้อง disconnect ก่อนเปลี่ยน
BLE connects to one device at a time. If switching phones, disconnect first.
📦 อุปกรณ์ที่ต้องเตรียม
📦 Materials Needed
-
1micro:bit v2 (แนะนำ 1 ตัว/คน หรือ 2 คนต่อ 1 ตัว) micro:bit v2 (1 per student recommended, or 2 per device)
-
2โทรศัพท์ Android ที่มี Bluetooth + ติดตั้งแอป Gamepad for micro:bit แล้ว Android phone with Bluetooth + Gamepad for micro:bit app installed
-
3คอมพิวเตอร์ หรือแท็บเล็ต สำหรับเขียน MakeCode (makecode.microbit.org) Computer or tablet for MakeCode (makecode.microbit.org)
-
4สาย USB สำหรับ flash โปรแกรมลง micro:bit USB cable to flash the program to micro:bit
-
5หุ่นยนต์ robot car: Maqueen Lite / Tiny:Bit / Ringbit Car V2 (1 คัน/กลุ่ม) Robot car: Maqueen Lite / Tiny:Bit / Ringbit Car V2 (1 per group)
🧠 Computational Thinking ในบทเรียนนี้
🧠 Computational Thinking
Decomposition
แตก robot
เป็นส่วนๆ Break robot
into parts
เป็นส่วนๆ Break robot
into parts
command ไหนทำอะไร? robot ต้องการ input กี่อัน?
Which command does what? How many inputs does the robot need?
Pattern
รูปแบบ
ของ command Command
patterns
ของ command Command
patterns
UP → forward, DOWN → backward, LEFT/RIGHT → เลี้ยว
UP → forward, DOWN → backward, LEFT/RIGHT → turn
Abstraction
ตัดสิ่งที่
ไม่จำเป็นออก Remove
the unnecessary
ไม่จำเป็นออก Remove
the unnecessary
robot ต้องการ command กี่อัน? จำเป็นทุกอันไหม?
How many commands does the robot actually need?
Algorithm
เขียนขั้นตอน
การทำงาน Write the
steps
การทำงาน Write the
steps
รับ "UP\n" → สั่ง motor → robot ขับไปข้างหน้า
Receive "UP\n" → command motor → robot drives forward
⏱ ตารางเวลา Workshop
⏱ Workshop Timeline
-
15 นาทีminPhase 01 · Hookลองขับ robot สำเร็จรูปก่อน Try the pre-programmed robot firstวิทยากรสาธิต robot ที่โปรแกรมแล้ว ให้เด็กลองกด D-pad ขับจริง แล้วถามว่า "อยากเขียนโค้ดให้ robot ทำอะไรก็ได้เองไหม?" Instructor demos the pre-programmed robot — kids try the D-pad, then ask: "Want to write code that makes the robot do anything you design?"
-
20 นาทีminPhase 02 · ThinkComputational Thinking — วิเคราะห์ปัญหาร่วมกัน Computational Thinking — Analyze the problem togetherแตก logic ว่าระบบทำงานยังไง: Gamepad ส่ง BLE UART → micro:bit รับ → สั่ง motor → robot ขยับ พร้อมวาด flow บนกระดาน Break down how the system works: Gamepad sends BLE UART → micro:bit receives → commands motor → robot moves. Draw the flow on the board together.
-
60 นาทีminPhase 03 · Buildเขียนโค้ด MakeCode + Flash + Connect Write MakeCode + Flash + Connectเขียน MakeCode รับ BLE UART ("UP\n", "DOWN\n", "LEFT\n", "RIGHT\n") → สั่ง motor ของ robot → Flash ลง micro:bit → เปิด Gamepad app → Scan & Connect → ทดสอบการเคลื่อนที่ Write MakeCode to receive BLE UART ("UP\n", "DOWN\n", "LEFT\n", "RIGHT\n") → command robot motors → Flash to micro:bit → open Gamepad app → Scan & Connect → test movement
-
20 นาทีminPhase 04 · Play & Shareขับ robot ผ่าน obstacle course! Drive robot through the obstacle course!เด็กๆ ขับ robot ผ่าน course ที่ครูสร้างไว้ ทดสอบว่าโค้ดทำงานถูกต้อง แชร์สิ่งที่อยากปรับปรุง และเพิ่ม feature พิเศษ (เช่น บีบแตร, LED pattern) Students drive the robot through the instructor's course, test if code works correctly, share improvements, and add special features (e.g., horn sound, LED pattern)
💻 ตัวอย่างโค้ด — กดปุ่ม Gamepad → แสดงผล LED
💻 Code Example — Press Gamepad Button → Show LED
// ── Receive commands ─────────────────────────────────
bluetooth.onUartDataReceived("\n", function () {
    let cmd = bluetooth.uartReadUntil("\n").trim()
    // ป้องกันการทำงานซ้ำถ้าคำสั่งเดิมส่งมาต่อเนื่อง
    if (cmd == lastCommand) { return }
    lastCommand = cmd

    if (cmd == "UP") {
        basic.showArrow(ArrowNames.North)
    } else if (cmd == "DOWN") {
        basic.showArrow(ArrowNames.South)
    } else if (cmd == "LEFT") {
        basic.showArrow(ArrowNames.West)
    } else if (cmd == "RIGHT") {
        basic.showArrow(ArrowNames.East)
    } else if (cmd == "STOP") {
        basic.clearScreen()
        basic.showIcon(IconNames.No)
        basic.pause(200)
        basic.clearScreen()
    } else if (cmd == "A") {
        basic.showIcon(IconNames.Heart)
    } else if (cmd == "B") {
        basic.showIcon(IconNames.Happy)
    } else if (cmd == "C") {
        basic.showString("C")
    } else if (cmd == "D") {
        basic.showString("D")
    } else {
        basic.clearScreen()  // คำสั่งไม่รู้จัก → ล้างหน้าจอ
    }
})

let lastCommand = ""

// ── Startup ──────────────────────────────────────────
bluetooth.startUartService()       // เปิดบริการ Bluetooth UART
basic.showIcon(IconNames.Ghost)   // แสดงรูปผีตอนเปิดเครื่อง
basic.pause(500)
basic.clearScreen()
📌 ต้องเพิ่ม Extension: Bluetooth ใน MakeCode ก่อน (Extensions → ค้นหา "bluetooth")
📌 Add Extension: Bluetooth in MakeCode first (Extensions → search "bluetooth")
↑ UP
"UP\n"
↓ DOWN
"DOWN\n"
← LEFT
"LEFT\n"
→ RIGHT
"RIGHT\n"
⏹ STOP
"STOP\n"
A · Heart
"A\n"
🔌 วิธี Flash โปรแกรมลง micro:bit — 7 ขั้นตอน
🔌 How to Flash the Program — 7 Steps
01
เพิ่ม Bluetooth Extension
Add Bluetooth Extension
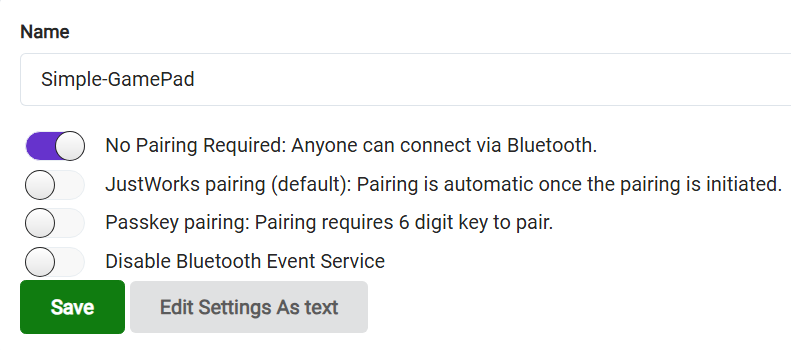
MakeCode → Extensions → ค้นหา "bluetooth" → Add → กด ⚙️ (toolbar บน) → Project Settings → เลือก No Pairing Required → Save
MakeCode → Extensions → search "bluetooth" → Add → click ⚙️ (top toolbar) → Project Settings → select No Pairing Required → Save
02
เขียนหรือ copy โค้ด
Write or paste code
กดปุ่ม JavaScript มุมบนขวาของ MakeCode → paste โค้ดจาก section 💻 ด้านบน
Click JavaScript (top-right in MakeCode) → paste code from the 💻 section above
03
กด Download
Click Download
กดปุ่ม Download มุมล่างซ้าย → ได้ไฟล์ .hex
Click Download bottom-left → you get a .hex file
04
ต่อสาย USB
Connect USB cable
เสียบ USB เข้า micro:bit แล้วต่อคอมพิวเตอร์ — drive MICROBIT จะปรากฏ
Plug USB into micro:bit, connect to computer — MICROBIT drive appears
05
Copy ไฟล์ .hex ไป MICROBIT
Copy .hex to MICROBIT drive
ลาก (drag) หรือ copy ไฟล์ .hex ไปวางใน drive MICROBIT
Drag or copy the .hex file into the MICROBIT drive
06
รอ LED เหลืองกะพริบเสร็จ
Wait for LED to stop blinking
LED เหลืองบน micro:bit กะพริบ ~5–10 วิ — หยุด = flash สำเร็จ!
Yellow LED blinks ~5–10 sec — stops = flash complete!
07
ถอด USB → ใส่ robot → เปิดแอป Gamepad → Scan → Connect → ทดสอบ!
Remove USB → put in robot → open Gamepad app → Scan → Connect → Test!
กดปุ่ม D-pad บนแอป — LED บน micro:bit ควรแสดง arrow ตามทิศที่กด
Press D-pad in the app — micro:bit LED should show arrows matching each direction
⚙️ อย่าลืมตั้งค่า Pairing Mode: หลังเพิ่ม Bluetooth extension ให้เปิด settings → เลือก No Pairing Required → Save ถ้าไม่ตั้งค่า default จะเป็น JustWorks ซึ่งยังต้องผ่านระบบ Bluetooth ของโทรศัพท์อยู่
⚠️ Radio conflict: MakeCode จะถาม "Remove incompatible extensions?" — กด Remove เพื่อยืนยัน (Bluetooth กับ Radio ใช้ wireless module เดียวกัน ใช้พร้อมกันไม่ได้) ⚙️ Set Pairing Mode: After adding the Bluetooth extension, open its settings → select No Pairing Required → Save. Without this, the default is JustWorks which still requires phone system pairing.
⚠️ Radio conflict: MakeCode will ask "Remove incompatible extensions?" — click Remove (Bluetooth and Radio share the same wireless module and cannot run together)
💬 คำถามสะท้อนคิด (หลัง Workshop)
💬 Reflection Questions (after Workshop)
-
Q1แอป Gamepad ส่งข้อความอะไรไป micro:bit เมื่อกด UP? และเมื่อกด LEFT? (ตอบเป็น text จริงๆ) What text does the Gamepad app send to micro:bit when UP is pressed? And LEFT? (answer with the actual string)
-
Q2Input → Process → Output ในระบบ BLE Robot ของเราคืออะไร? ยกตัวอย่างให้ชัดเจน What are Input → Process → Output in our BLE Robot system? Give a specific example.
-
Q3ตอน Bluetooth ไม่เชื่อมต่อ เราแก้ปัญหายังไง? เหมือนกับการ debug โค้ดอย่างไร? When Bluetooth wouldn't connect, how did you solve it? How is that similar to debugging code?
-
Q4ถ้าอยากให้ robot ทำสิ่งพิเศษเมื่อกดปุ่ม A (เช่น บีบแตร หรือ LED pattern) จะเพิ่มโค้ดตรงไหนใน MakeCode? If you want the robot to do something special when button A is pressed (e.g., horn or LED pattern), where in MakeCode would you add the code?